Text Classification 3: A Machine Learning Powered Web App
Table of Contents
2. Converting A Model To A Rest API With FastAPI
3. Building A Web App With FastAPI & Bootstrap
4. Deploying The App With Docker & Google Cloud Run
Introduction 
In the last blogpost we covered building a text classification using Scikit-learn and using the Natural Language Toolkit (NLTK). We used a weighted Support Vector Machine to handle the imbalance of the classes in the datset. Once we trained our model we then serialized the Scikit-learn pipeline using Joblib.
In this post we'll build out a serverless web app using a few technologies. The advantage of using a serverless framework for me is cost effectiveness: I don't pay much at all unless people use my web app a ton and I don't expect people to visit this app very often. However, due to the serverless framework I will have issues with latency, which I can live with. I'll first go over how to convert my text classification model from the last post into a Rest API using FastAPI and Joblib. Using our model in this way will allow us to send our paper abstracts as json through an HTTP request and get back the predicted topic label for the paper abstract. After this I'll build out a web application usign FastAPI and Bootstrap. Using Bootstrap allows us to have a beautiful responsive website without having to write HTML or JavaScript. Finally, I'll go over deploying both the model API and Web app using Docker and Google Cloud Run to build out a serverless web application!
The reason we serve the model as a rest API seperate from the web app is that it gives us the ability test the model API independently. It also allows us to redploy a different model without having to redploy our web app!
Let's get into to the first step of converting our model as a Rest API.
Converting A Model To A Rest API With FastAPI 
The overall structure of my code for a model Rest API, called, modelapi has the structure:
- modelapi/
  - model/
      - weighted_svm.joblib
  - modeleapi/
      - install_nltk.py
      - Relabeler.py
      - Tokenizer.py
  - main.py
  - requirements.txt
  - setup.py
  - setup.cfg
  - Dockerfile
Let's first discuss the boilerplate structure first. The model directory contains the persisted model while the modelapi directory contains some helper functions as well as the StemTokenizer class from the last post. We need the StemTokenizer class accessible in the script that loads the persisted Scikit-Learn Pipeline for predictions since it uses this class in one of its stages.
We also have a labeler function the modelapi directory which maps our prediction from the target variables 0-3 to the text "Artificial Intelligent", "Machine Learning", etc. This function looks like:
def relabel(predicted : int) -> str:

    labels = {0: "Artifical Intelligence",
              1: "Computer Vision",
              2: "Machine Learning",
              3: "Robotics"}

    return labels[predicted]
We keep this function in a file called Relabeler.py. Lastly there is a script in modelapi called istall_nltk.py that contains the following:
import nltk

if __name__ == "__main__":
    for package in ['stopwords','punkt','wordnet']:
        nltk.download(package,download_dir='/usr/local/share/nltk_data')
This script is purely for the downloading the data needed by the NLTK for stop word removal and stemming. This script will be important during the build of the Docker image since we need to download the NLTK data into the container.
Next we have the requirements.txt file that has the the Python library dependencies for this project. The last thing we remark about are the files setup.py and setup.cfg which are used to create a Python package called "modelapi" so that we can import the Tokenizer as
from modelapi.Tokenizer import StemTokenizer
These two setup files were created using Cookiecutter library.
Let's get to the meat of the Rest API which is contained in the main.py script:
app = FastAPI()

class InputDoc(BaseModel):
  text  : str

class LabeledDoc(InputDoc):
  label : str

@app.post('/predict', response_model=LabeledDoc, status_code=200)
def predict(doc : InputDoc):
    """
    Help from https://testdriven.io/blog/fastapi-machine-learning/
    """

    text   = doc.text
    model  = joblib.load("models/weighted_svm.joblib")
    result = model.predict([text])
    label  = relabel(result[0])

    return {"text": text, "label":label}
Let's talk through what's going on in this script. The FastAPI is similar to the Flask which is a micro-framework for building web applications. FastAPI has a number of advantages over Flask: It is incredible fast, allows for async communication and makes strong use of typing for type hints and function annotators. The later is something that I find particularly cool as FastAPI uses this to create automatic documentation for the API using Swagger UI.
The first line creates the app object:
app = FastAPI()
Next is the class InputDoc which an extension of BaseModel class that allows us to define the input variable of our predict function to have the form:
{'text':'This abstract will be about Artificial Intelligence and ...'}
InputDoc will be a dictionary that contains a key called 'text' that has a value of type str. The string-value of the dictionary will be our input abstract. The return value of our predict function will be of type LabeledDoc. The class LabeledDoc extends InputDoc to add another key to the dictionary called label and associated value of type str. The string value for label will be the label for the topic of the abstract. The returned data of the predict function will be,
{'text':'This abstract will be about Artificial Intelligence and ...',
 'label': 'Artifical Intelligence'}
Inside the predict function we can see we get the text from the input InputDoc called doc. We then load the model with joblib and use it to predict the target value from the text. We then convert the target variable to be a string using the relabel function. Finally, we return the text and label as a dictionary like the above.
We can start up the rest API with the command from the modelapi dictionary with the commmand:
python main.py
This is possible since we added this code to the bottom of the script:
if __name__ == "__main__":
    uvicorn.run(app, host="0.0.0.0", port=8000)
This uses the uvicorn library to run the rest API locally on port 8000; I should note using uvicorn this way is more for debugging. For production we use the command:
uvicorn --workers 2 --host 0.0.0.0 --port 8000 main:app
The last command is exactly what we use in the Dockerfile to deploy this API (except we use port 8080 as will be discussed later). We can then get predictions from this API using the requests library like the following:
import requests

data = '{"text":"This abstract will be about Artificial Intelligence and ..."}'

result = requests.post(url="http://0.0.0.0:8000/predict",
                       data  = data,
                       headers = {'Content-Type':'application/json'})

result.json()
The fact we had to use the /predict extension the of the web addres comes from FastAPI's decorator:
@app.post('/predict', response_model=LabeledDoc, status_code=200)
that is above the predict function. The decorator also tells us that the functions return type is of the type LabeledDoc.
One amazing part of FastAPI is the autodocumentation generation. We can see this in action by going to the address http://0.0.0.0:8000/docs:
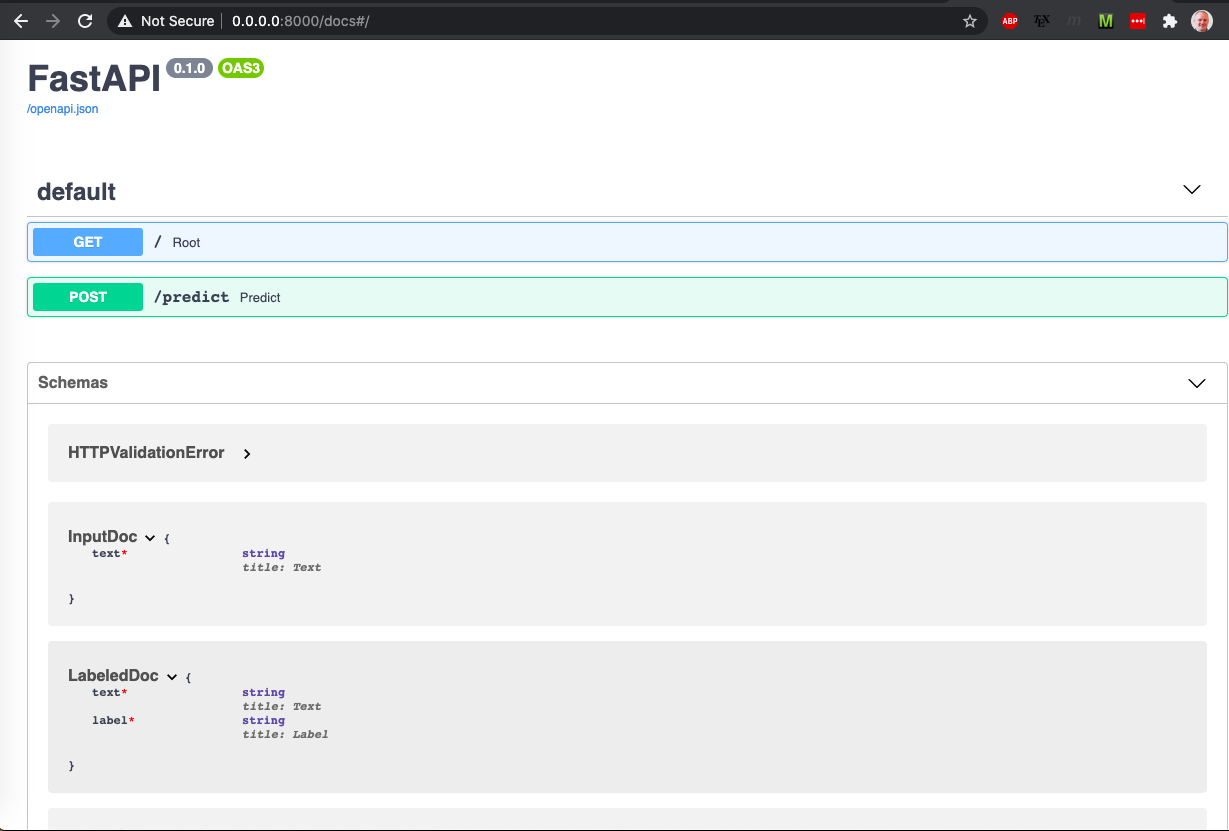
We can see more info about the input type and output type of the rest api. This is all thanks to the power of using typing! Clicking on the POST button creates a drop down with even more information:
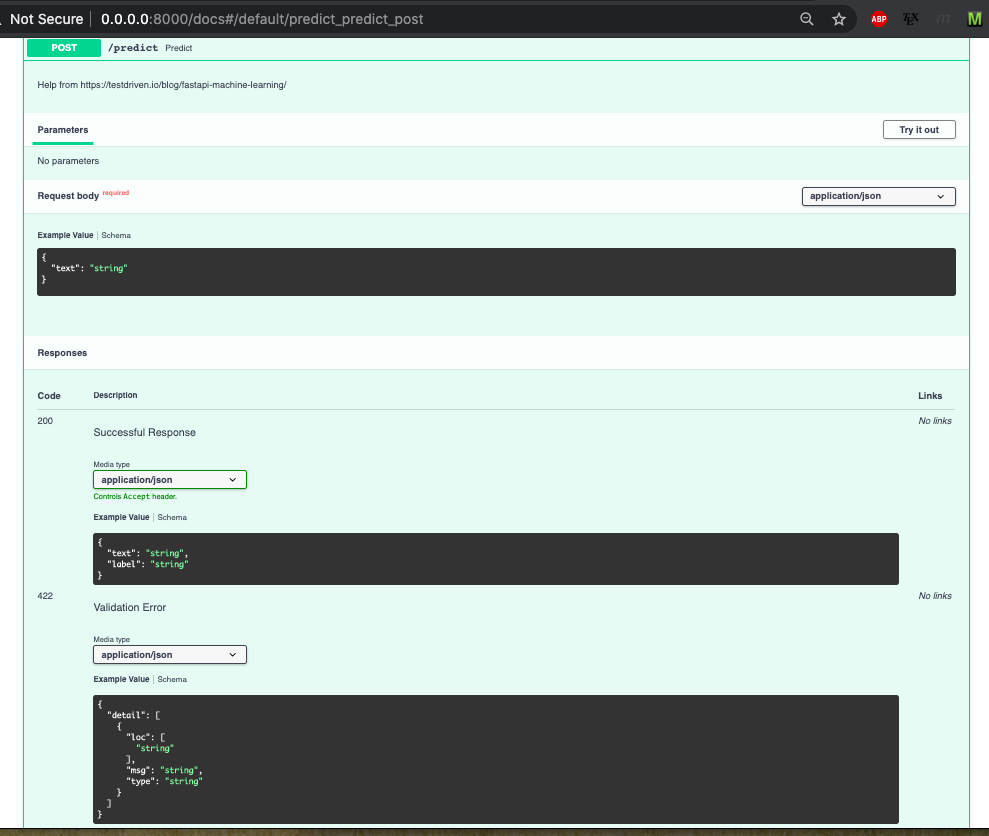
This type of information on the input and ouput is super helpful for developers! In the we next section we can see how to use this rest API through a web app.
Building A Web App With FastAPI + Bootstrap 
The web app directory has the structure:
- webapp/
    - Dockerfile
    - requirements.txt
    - app/
        - static/
        - templates/
        - main.py
We discuss the Dockerfile in the next section. The requirements.txt file contains all the Python library dependencies needed for the web app. We then have a subdirectory called app which contains a sub-directories static and templates. These last two directories contain the HTML, CSS and JavaScript from Bootstrap. I don't want to go into how Bootstrap works as it can be its own blogpost. Instead I will point to other references which explain how to use it with Flask (see here and here).
The main.py script looks like:
app = FastAPI()

app.mount("/static", StaticFiles(directory="static"), name="static")

templates = Jinja2Templates(directory="templates")

@app.get('/', response_class=HTMLResponse)
@app.get('/input',response_class=HTMLResponse)
def input_page(request: Request):

    return templates.TemplateResponse("input.html", {"request": request})


@app.get("/output", response_class=HTMLResponse)
def output_page(request: Request, text : str):

    clean_text  = re.sub(r"[^a-zA-Z0-9_]", " ", text)

    data  = '{"text":"' + clean_text + '"}'

    result = requests.post(url   = "http://0.0.0.0:8080/predict",
                         data  = data,
                         headers = {'Content-Type':'application/json'})

    topic  = result.json()["label"]

    return templates.TemplateResponse("output.html", {"request": request,
                                                      "text": text,
                                                      "topic": topic})
We can see again we create the app:
app = FastAPI()
We then add the app/static/ sub-directory to the app object with the command:
app.mount("/static", StaticFiles(directory="static"), name="static")
We can get the templated HTML files from the app/templates/ sub-directory with the command:
templates = Jinja2Templates(directory="templates")
The input_page function takes in a Request object called request and passes it to use in the input.html kept in the templates directory through the command:
templates.TemplateResponse("input.html", {"request": request})
This returns the html of the input (as signnified by the decorator returning an HTMLResponse) page which prompts the user to enter a paper abstract as shown below:
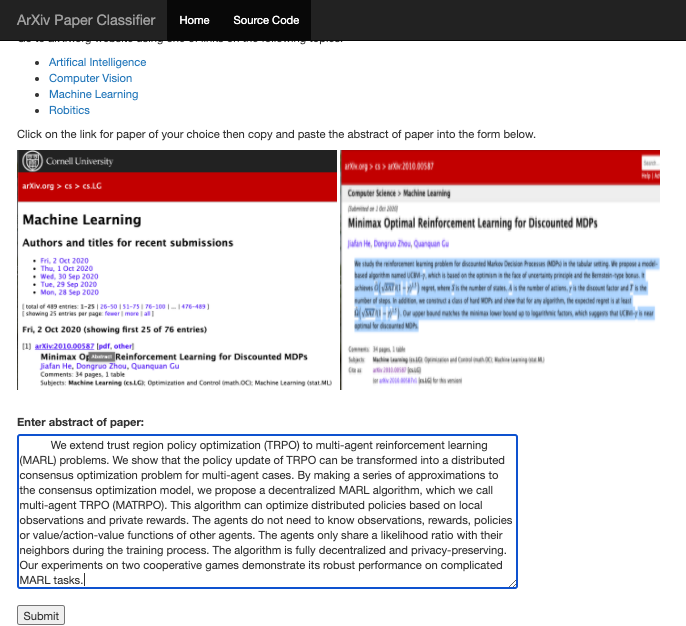
When the user enters the text and hits the "Submit" button the script then passes the Request object and entered text to the output_page function. The output_page strips any non-alphnumeric characters from the text and passes it to the Rest API model using the request package exactly as we did prior!
We get the article's topic from the returned json object from the model's APi and pass it to the "output.html" file in the the templates directory through the command:
templates.TemplateResponse("output.html", {"request": request,
                                           "text": text,
                                           "topic": topic})
This returns an HTMLResponse that is the output page and looks like:
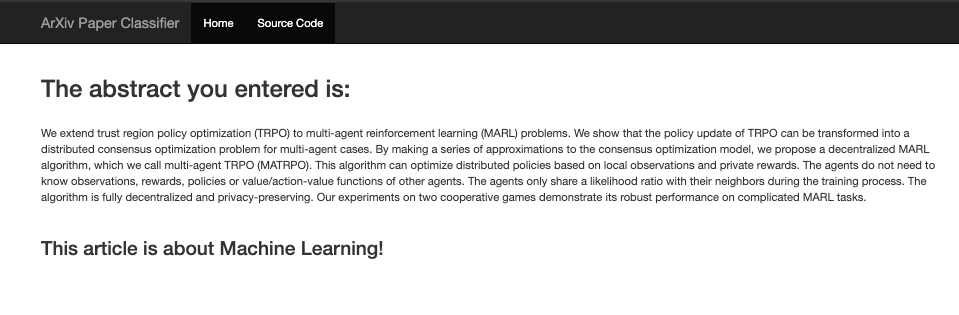
The output page has both the entered paper abstract text as well as the predicted topic of the paper.
We now have a fully functional machine learning based web app!
We can run web app by using the command from the webapp directory:
uvicorn --host 0.0.0.0 --port 8080 main:app
In the Dockerfile this is exactly what we do to run this app.
Deploying The App With Docker + Google Cloud Run 
Now let's go over how to deploy this web app to Google Cloud Run. Cloud Run is super easy to use, cost efficient and requires us to use have Docker to deploy our API and web app. We first deploy our model Rest API as we will need its URL before we deploy the web app. We note the Dockerfile for deploing the model API can be seen here. The first thing to note is that we have to create this image off of the miniconda3 image. The reason for using miniconda is that it already has a lot the dependencies necessary for running scientific Python libraries. The other thing to note is that the API must use port 8080 instead of 8000 as this is necssary for using Cloud Run.
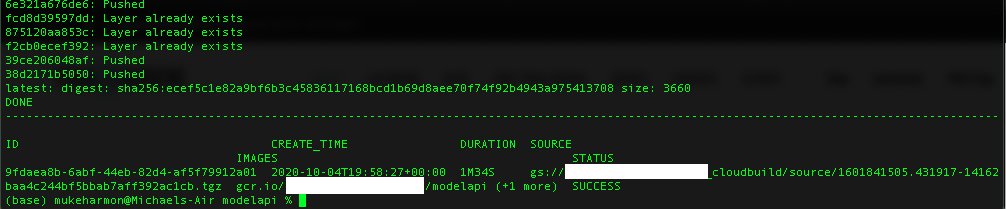
We build and submit the image for the model rest API to the Google Container Registry. We do this from the modelapi directory which contains the Dockerfile with the command:
gcloud builds submit --tag gcr.io/<project-id>/modelapi
This builds an image called modelapi and after the build is complete we see the following:
We can find image the registry from the Google Cloud console:

We can then deploy the modelapi conatainer to Cloud Run with the command:
gcloud run deploy --image gcr.io/<project-id>/modelapi --platform managed
Notice how we deploy the container from the modelapi image in the contianer registry. After running the last commmand we will be prompted with a series of questions about our deplomyment:
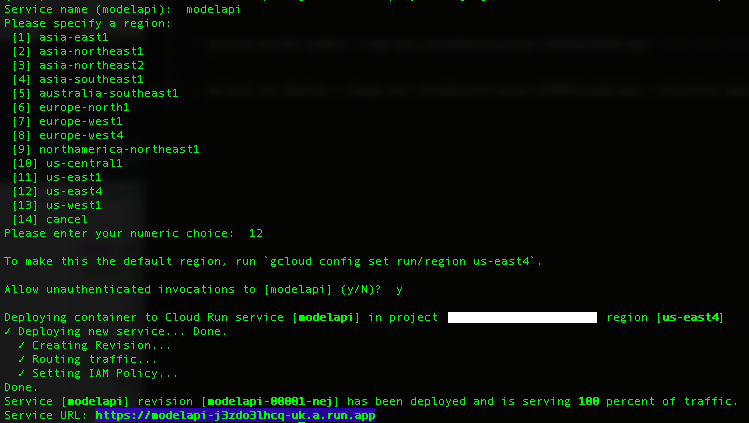
The highlighted URL is the address for our Rest API! We then replace the URL https://0.0.0.0:8000/predict in the webapp/app/main.py with the URL listed in the termal:
result = requests.post(url     = "https://modelapi-j3zdo3lhcq-uc.a.run.app/predict",
                       data    = data,
                       headers = {'Content-Type':'application/json'})
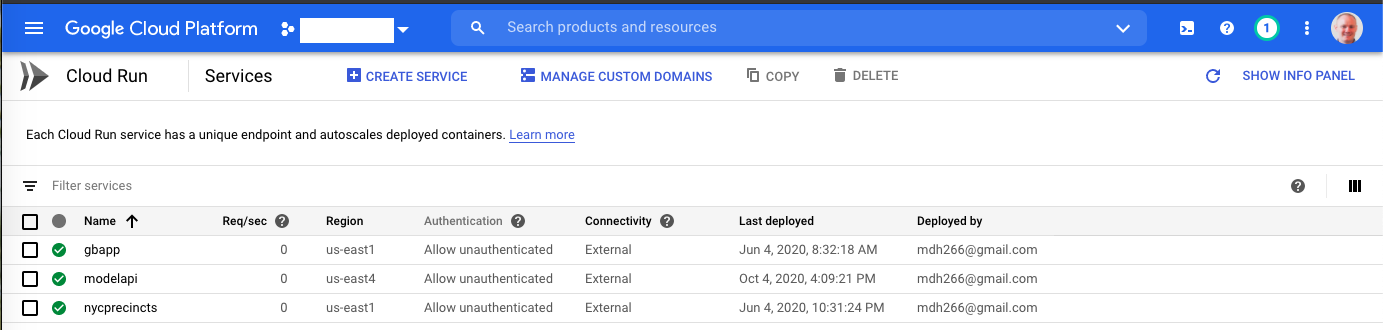
We can check that the container is running in the Cloud Run console:
We next create the Dockerfile for the web app. Since this web app doesnt use any scientific libraries we can get away with using the lightweight alpine image so our app's image is smaller.
We then push the image (named webapp) to the Google Container Registry with the command:
gcloud builds submit --tag gcr.io/<project-id>/docwebapp
And then after it is successfully built we can deploy the container to Cloud Run:
gcloud run deploy --image gcr.io/<project-id>/docwebapp --platform managed
This returns us an url: https://docwebapp-j3zdo3lhcq-uc.a.run.app and going to this web address we can see our app in production!
Conclusions 
In this post we went over how to convert a model into a rest API using FastAPI. We then went over how to create a web app using FastAPI and Boostrap. This web app prompts the user to enter a paper abstract and passes the text to the model rest API to get the predicted topic of the article. The web app returns the entered text and predicted output. We then deployed the rest API and web app to Google Cloud using Docker and Cloud Run to make the app serverless! We covered a lot of cool topics in this post, I hope you enjoyed reading it!