ETL Pipelines With Airflow
3. Setting Up A PostgreSQL Database
5. An Example ETL Pipeline With Airflow
Introduction 
In this blog post I want to go over the operations of data engineering called Extract, Transform, Load (ETL) and show how they can be automated and scheduled using Apache Airflow. You can see the source code for this project here.
Extracting data can be done in a multitude of ways, but one of the most common ways is to query a WEB API. If the query is sucessful, then we will receive data back from the API's server. Often times the data we get back is in the form of JSON. JSON can pretty much be thought of a semi-structured data or as a dictionary where the dictionary keys and values are strings. Since the data is a dictionary of strings this means we must transform it before storing or loading into a database. Airflow is a platform to schedule and monitor workflows and in this post I will show you how to use it to extract the daily weather in New York from the OpenWeatherMap API, convert the temperature to Celsius and load the data in a simple PostgreSQL database.
Let's first get started with how to query an API.
Calling An API In Python 
To use a Web API to get data, you make a request to a remote web server, and retrieve the data you need. In Python, this is done using the requests module. Below I wrote a module, getWeather.py, that uses a GET request to obtain the weather for Brooklyn, NY. To get a better feel for how the request below works, check out the OpenWeatherMap API documentation page here.
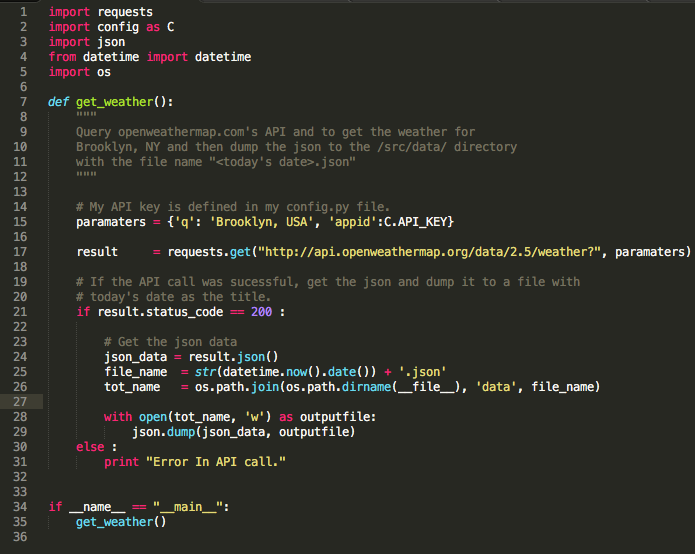
Notice that I keep my API key in a seperate file called config.py. In order to use this code yourself you would have to obtain your own API key and either substitute it into the code directly or have a variable API_KEY = your-api-key in a config.py file. After the request has been made, I check to see if it was successful by checking the status_code,
result.status_code == 200
otherwise, I print an error. Proper exception handling here is definitely something I will add in the future. If the request is succesfull, then weather data is returned and is then dumped into a JSON file with a name that is the current date using the JSON package.
The above code is stored in a file title getWeather.py and be run from the command line by typing from the appropriate directory:
python getWeather.py
Note that this is the exact Bash command that I'll use to have Airflow collect daily weather data. A great introduction into using API's with Python can be found here. Now, let's go over how to set up a PostgreSQL database.
Setting Up PostgreSQL Database 
I went over the basics of how to use PostgresSQL in a previous blog post, so I'll just present the code I used to make one here. The code below creates a table called weather_table in a local PostgreSQL database named WeatherDB.
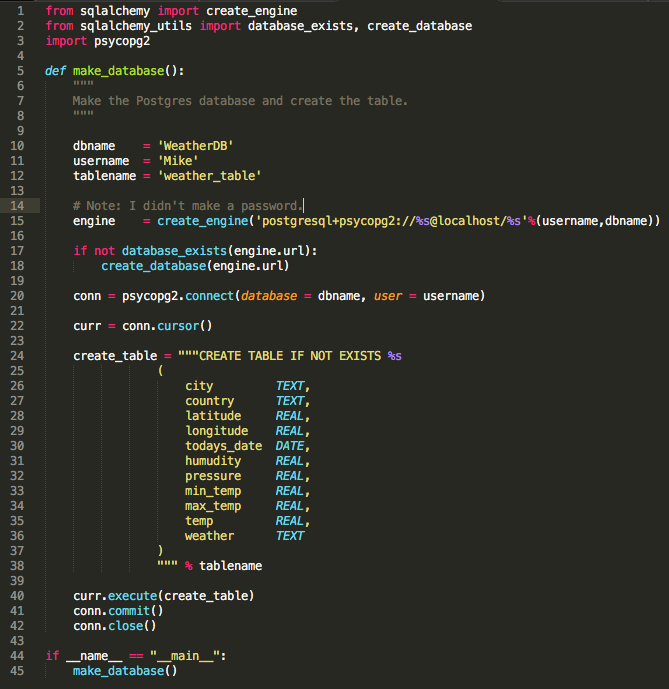
I only take a subset of the data that is returned from OpenWeatherMap. Specifically I transform and load the following into the database,
- the city name
- the country name
- the latitude and longitude of the city
- the date the API call was made
- the humidity
- the pressure
- the minimum temperature of the day
- the maximum temperature of the day
- the current temperature
- a description of the weather
This script is stored in a file name makeTable.py and can be run using the command,
python makeTable.py
From the appropriate directory and before we set up our Airflow job . Since this is just one single table, I'm not going to worry about such things as primary and foreign keys (checkout this post to learn what these are). Lastly, note that I don't have any password necessary to access the database, this was just for convience. Now we can dive into Airflow!
Introduction To Airflow 
As mentioned in the introduction Airflow is a platform to schedule and monitor workflows as well as a method to set up data pipelines. Data pipelines in Airflow are made up of DAGs (Directed Ayclic Graphs) that are scheduled to be completed at specific times. Each node in the DAG is a task that needs to be compeleted. Tasks that are dependent upon the completion of other tasks are run sequentially and tasks that are not dependent upon one another can be run in parallel.
The main components of Airflow are
Metadata DB (database) : Keeps track of tasks, how long each run took, etc.
Webserver (Flask based UI) : The webserver talks to metadata db to get information to present.
Scheduler : This scrolls the file system and puts things into the queue.
Workers : These are the machines that actually do the tasks; they can can be separate machines from scheduler or the same.
Airflow will dump all information about your DAGs into logs. The logs are going to be dumped to a file or database as well. Just for simplicity I made a local directory with the path,
~/airflow/logs
Notice the choice of directory to dump the logs is decided by what base_log_folder is set to in the airflow.cfg file. You can change it to store the logs remotely by setting the remote_base_log_folder variable in the airflow.cfg file.
Installing Airflow
To install airflow first set your airflow home directy by typing the following into your terminal,
export AIRFLOW_HOME=<path_to_airflow_home>
I chose to set AIRFLOW_HOME=~/airflow which is the default setting. We can now install airflow with PostgreSQL using pip:
pip install airflow[postgres]
Metadata DB
We then initialize the metadata database by typing,
airflow initdb
Out of the box, Airflow uses a SQLite database, which you should outgrow fairly quickly since no parallelization is possible using this database backend. The defaullt SQLite database file will be located in the directory: AIRFLOW_HOME/airflow.db. You can change the database choice using the sql_alchemy_conn variable in the airflow.cfg file.
Webserver
We can start the webserver locally using the command,
airflow webserver -p 8080
Then plug in http://0.0.0.0:8080/ into browser and you will get the Airflow UI. The webserver is extemely helpful to understand what DAGS are running, how long they ran, when they ran, etc. It is also helpful in setting up connections to databases as I will show you how to do later.
Scheduler
The Airflow scheduler monitors all tasks and all DAGs, and triggers the tasks to run. Behind the scenes, it monitors and stays in sync with a folder for all DAG objects it contains The Airflow scheduler is designed to run as a service in an Airflow production environment. To kick it off, all you need to do is type,
airflow scheduler
Workers
In this example I won't be using any seperate workers since I'm running this on my personal computer.
Let's now get into how to use Airflow to set up an ETL pipeline!
An Example ETL Pipeline With Airflow 
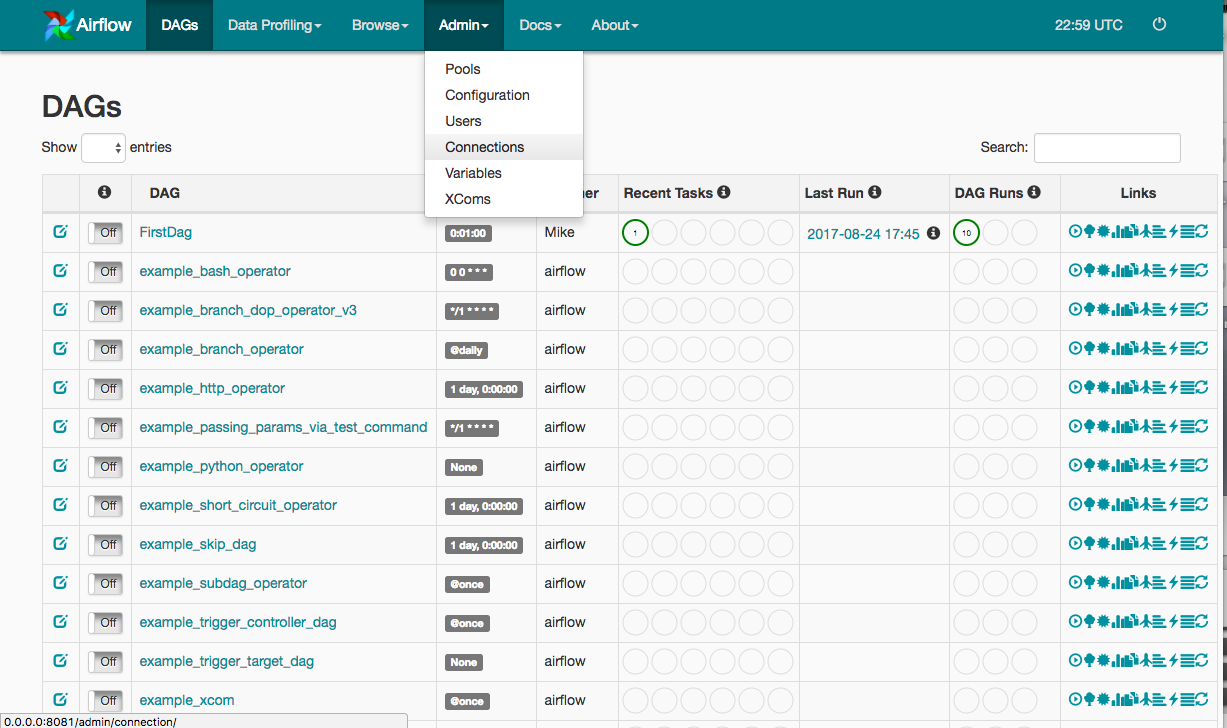
Let's go over an example of an Airflow DAG to that calls the OpenWeatherMap API daily to get weather in Brooklyn, NY and stores the data in the Postgres database that we created. The first thing we need to do is to create a connection to the database (postgres_conn_id). We do this by going the Airflow Webserver in our web-browser and clicking on Admin tab and then choosing connections as shown below:
Next, click on the create link and enter the information relevent to create our Postgres connection. You can see what I did below,
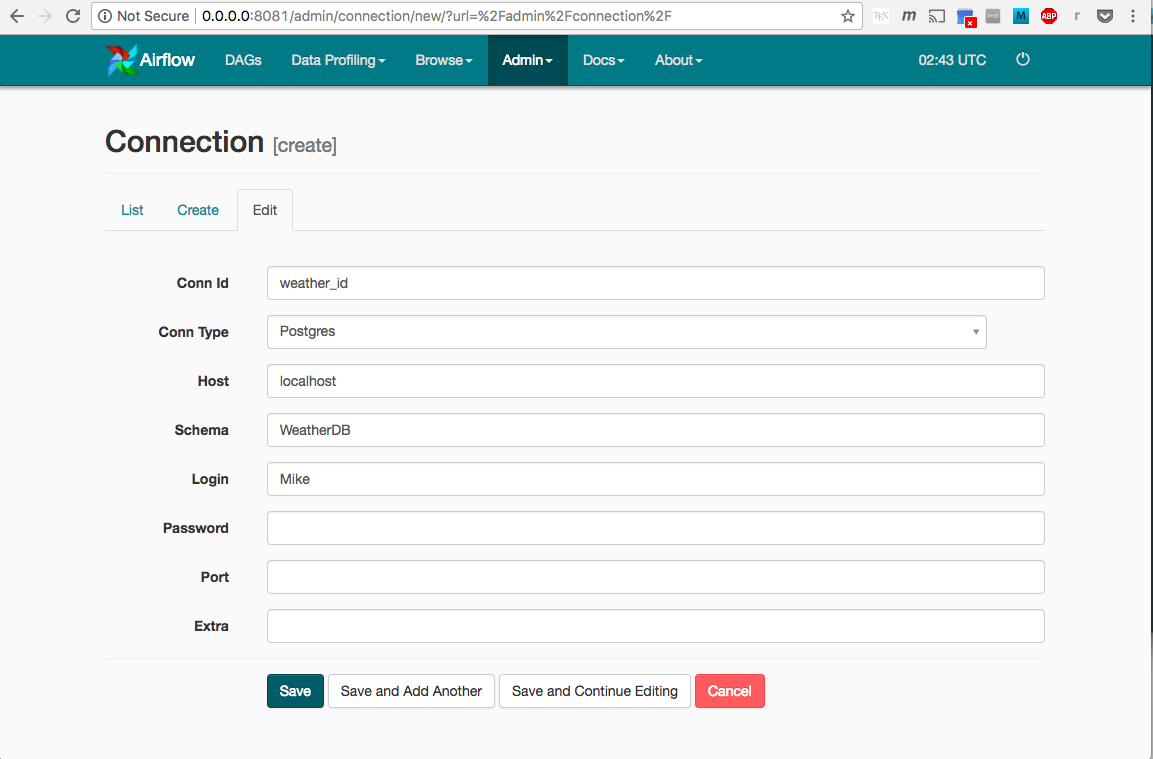
We then click save and can now use weather_id as our postgres_conn_id connnection id.
Now, lets jump into creating our DAG; this will be stored in a python file we will call by convention the DAG defintion file. In this file, the first thing we do is to import all the necessary libraries:
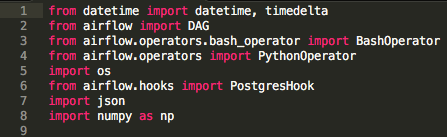
You can see that we import both the BashOperator and PythonOperator. While DAGs describe how to run a workflow and what tasks need to be completed before other aoperators determine what operations get done in those tasks. DAG operators generally run independently of other operators unless there are dependencies bewteen the two. Once an operator is instantiated, it is referred to as a “task”.
Now we define the Python function that will transform and load our JSON data object into our database. This can seen below in the function, load_data:
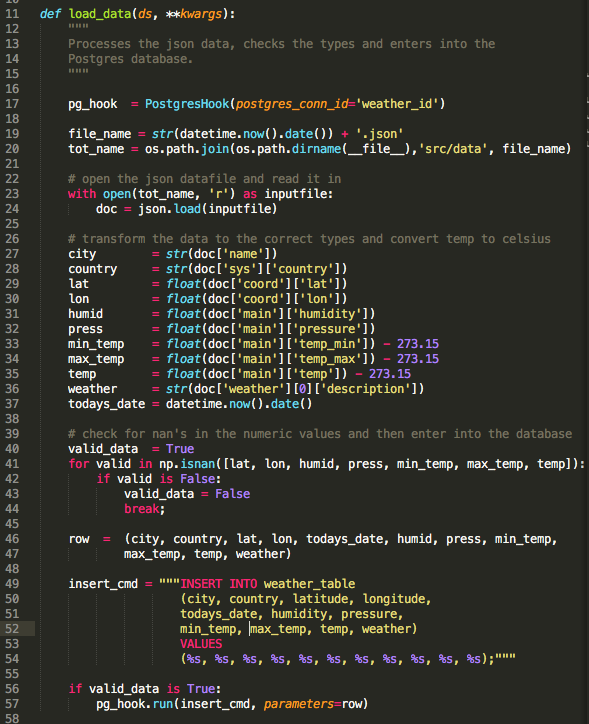
You can see that we instantiate a PostgresHook object and pass our postgres conection id, weather_id, to the constructor. We then get the current day's date so what we can load the appropriate JSON data from the API request of this day. Once we load the data, we can observer that it is a dictionary with string key-value pairs. We then transform the values in this dictionary and check to make sure that the numerical values are not NaNs using NumPy's isnan function. If there are any NaNs in the numerical data we flag this data as invalid.
Next we cast all the individual data field values into a tuple which we then pass as a paramter along with the SQL insertion command, insert_cmd, into the PostgresHook object's run method. The run method then inserts the data into the database. More checks on the validity and quality of our data would be better, but for the purposes of this blog post what we have done is sufficient. Also, note that as we have done things now, we enter one row into our database at a time, ideally to be efficient, we would load more than one data point at time.
Now let's dive into a DAG defintion below,
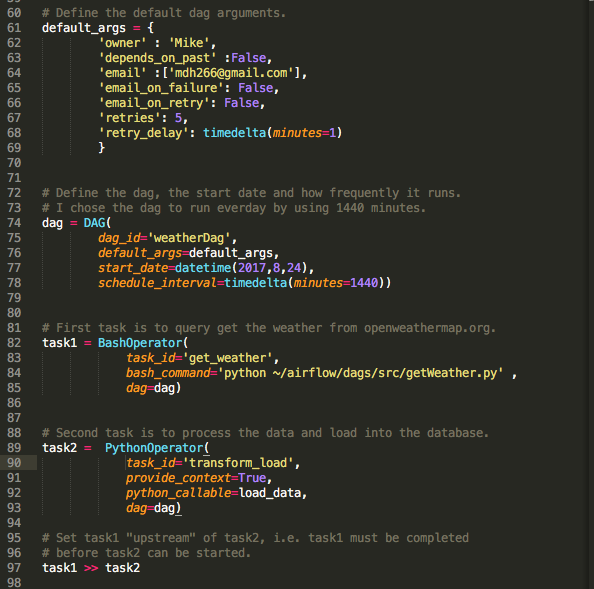
You can see that we first define our default parameters, default_paramter. This is a dictionary that includes such information as the owner of the DAG and how many times, and how frequently to retry running the DAG if it fails. Next, we instantiate our dag in the command,
dag = DAG(dag_id="weatherDag",
          default_args=default_args,
          start_date=datetime(2017,8,24),
          schedule_interval=timedelta(minutes=1440))
The dag_id needs to be unique. The dag_id will be passed off to all the tasks which needs to be completed during their instantiation. Every DAG will have a datetime object called the start_date which should be a future date as well as timedelta object, schedule_interval, that dictates how often to run the DAG. I set my DAG to run every 1440 minutes, i.e. everyday.
Next we intantiate a BashOperator operator which becomes a task that executes the API call as discussed before:
task1 = BashOperator(task_id='get_weather',
                    bash_command='python ~/airflow/dags/src/getWeather.py',
                    dag=dag)
Notice that we pass the DAG object in through the operator's constructor. We note that task_id's have to be unique within the DAG pipeline. We next instatiate a PythonOperator, task2, that transforms and loads the JSON data that was pulled from API into the database:
task2 =  PythonOperator(task_id='transform_load',
                        provide_context=True,
                        python_callable=load_data,
                        dag=dag)
Notice that we pass the function, load_data through the constructor as a keyword parameter, python_callable.
Finally, we set the up the DAG pipline by saying one task depends on the other being completed. You can declare that task1 needs to be completed before task2 can be started by using the following notation at the bottom of your .py script (DAG definition file):
task2.set_upstream(task1)
or,
task1 >> task2
Tasks which dont have dependencies between each other can be run concurrently.
That's it! Pretty cool right? The last thing I'll go over is some tricks I used to debug code while working with Airflow.
Debugging Airflow Codes 
Debugging code is always difficult and I found some useful tricks to help you figure out why your DAGs aren't working properly. First you can see if there is Python syntax error by "compiling it,"
python dag_def_.py
You can then test an individual task within a dag by using the command,
airflow test <dag_id> <task_id> <todays date>
You can also test the whole dag by doing a backfill,
Airflow backfill <dag_id> -s <todays_date> -e <todays_date>
Sometimes, in order to notify Airflow of an update you may need to delete the .pyc files or even the DAGs themselves. If you need to delete a dag, first delete the DAG data from the metadata_db database:
Use the UI -> Browse -> Dag Runs -> Then delete them all.
Then you can delete DAGs by clearing the task instance states:
airflow clear <dag_id>
Conclusions 
Airflow is an extremely useful tool for building data pipelines and scheduling jobs in Python. It is simple to use and in this post I went over an example how to perform ETL using Airflow. There are definitely more things Airflow can do for you and I encourage you to learn more about it. For a great overview video of Airflow check out this talk and for a more detailed introduction on Airflow check out the documentation page.